
Compart Launches DocBridge® Communication Suite
Market launch of the DocBridge® Communication Suite: New standards in flexibility and technology in customer communication management.
MoreWith the new Data Dictionaries, DocBridge® Communication Suite drastically simplifies the way in which data is integrated: A wide variety of external sources meet a stable, standardized data model. Whether simple .dds and .ddm configurations or multi-stage XSL transforming in the Gear process, this shows how dynamic data sets can be processed efficiently - and there is plenty of potential for the future!
Data Dictionaries were introduced as an MVP (Minimum Viable Product) in the Spring 2024 release of DocBridge® Communication Suite and have since been further improved.
The main goal of Data Dictionaries is to create an abstraction layer between external data sources with different (and possibly, e.g. due to migration) varying data structures and a stable, internal data model that can be used within the DBCS by different templates and processes.
Each DBCS environment can contain zero, one or more data dictionaries. If you prefer not to use data dictionaries, you can continue to use the approach known from previous DocBridge® Impress versions, where an “xml datafile” is assigned directly to each template and no mapping takes place.
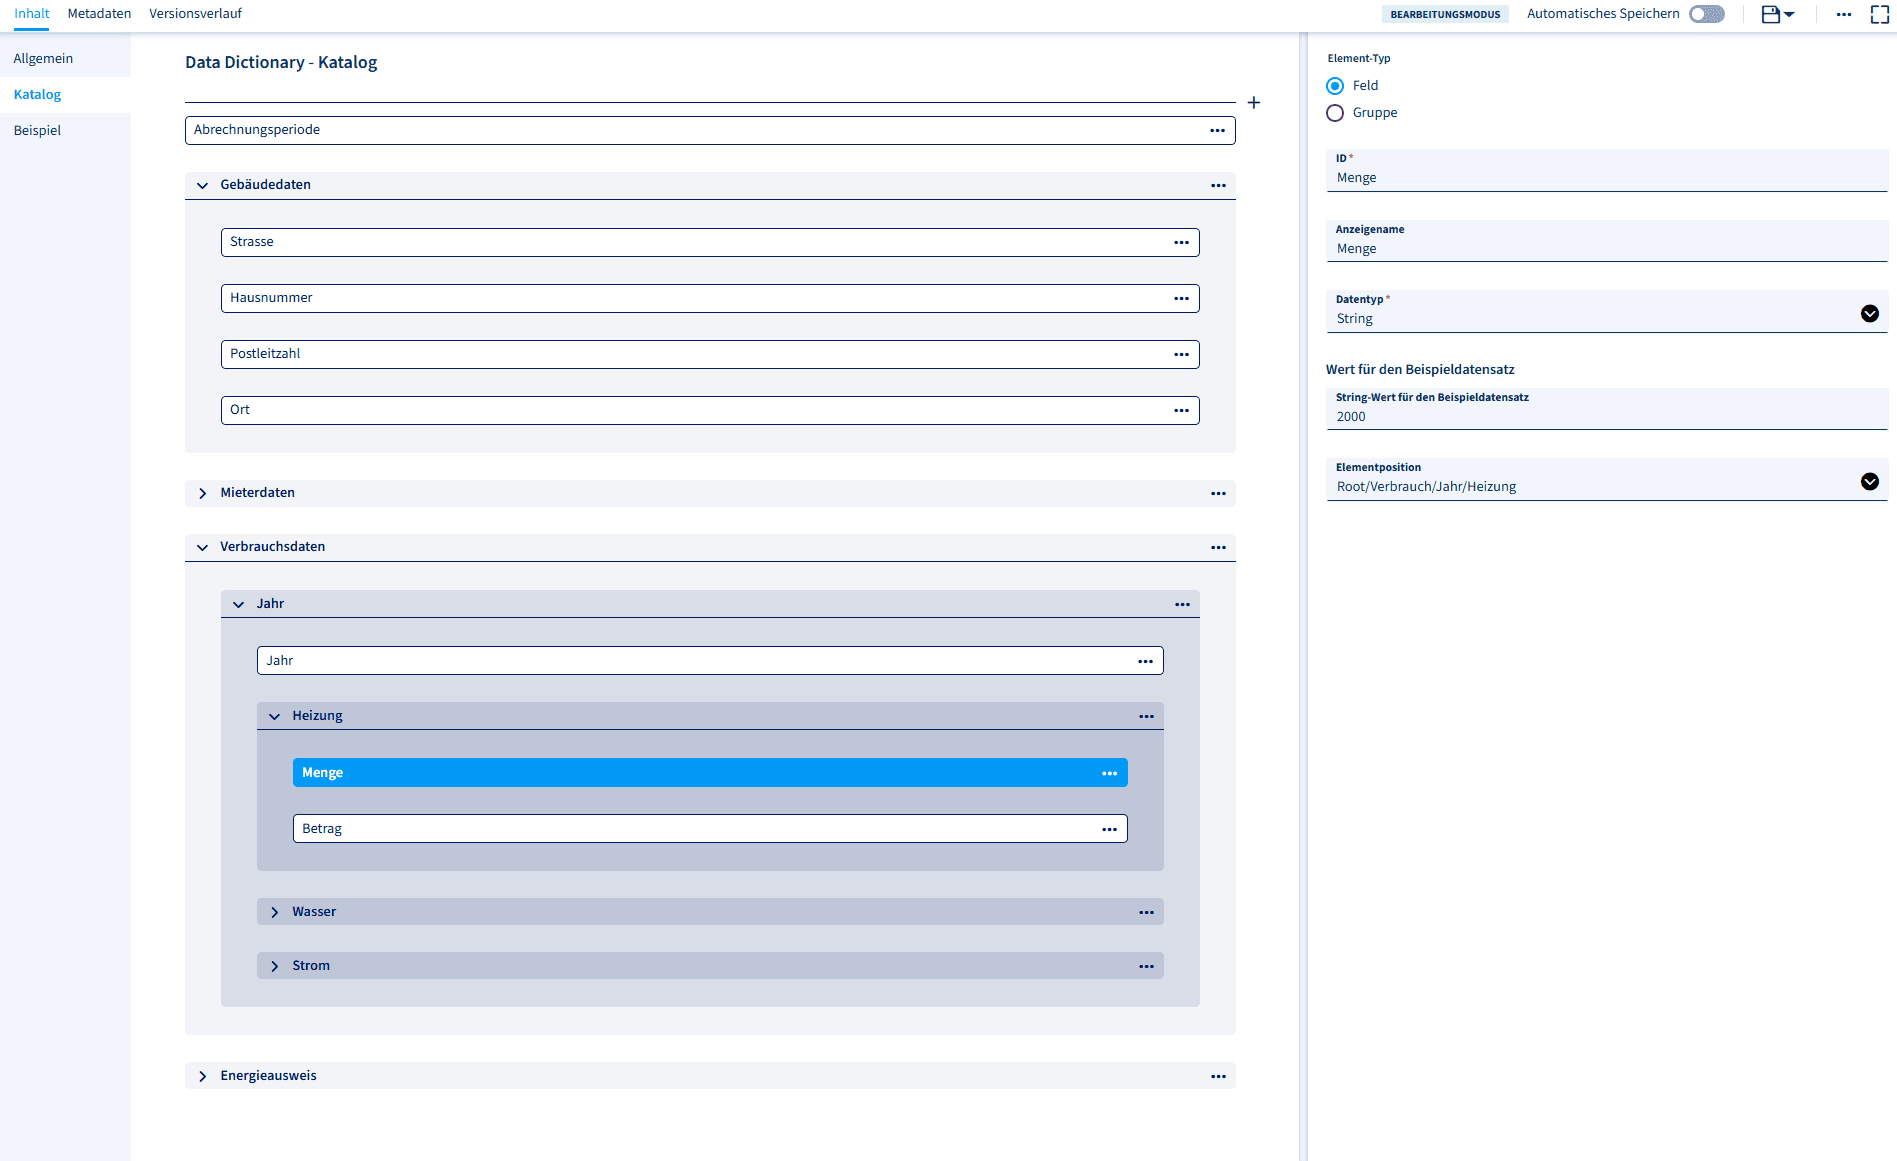
First, you need to create a data dictionary schema and store it in the Resource Director. This schema describes which fields you want to manage in your data dictionary, assigns them names and preview values (for the Impress Designer) and contains sample records that can be used in the preview mode of the Impress Designer or even in Gear workflows if there is no connection to the upstream data source.
You can use the convenient Data Dictionary Editor to create a data dictionary schema. To do this, click on “+” in Resource Director to create a new resource and then select the “Data Dictionaries” tile.
Alternatively, you can also create a data dictionary schema as an XML file and upload it to Resource Director. A simple data dictionary schema could look like this:
<?xml version="1.0" encoding="UTF-8"?>
<DataDictionary
	xmlns="http://www.compart.com/ns/data-dictionary/schema">
	<Name>DD Name</Name>
	<Title>Title of DataDictionary</Title>
	<Description>This is the description of the DataDictionary</Description>
	<DocumentMode mode="document" loop="/"/>
	<DataSchema id="Root">
		<DisplayName>Root</DisplayName>
		<Content>
			<Entry id="FirstName">
				<DisplayName>FirstName</DisplayName>
				<Preview>Marco</Preview>
			</Entry>
			<Entry id="LastName">
				<DisplayName>LastName</DisplayName>
				<Preview>Fabiani</Preview>
			</Entry>
			<Entry id="StreetName">
				<DisplayName>StreetName</DisplayName>
				<Preview>Mühlenstraße</Preview>
			</Entry>
			<Entry id="HouseNumber">
				<DisplayName>HouseNumber</DisplayName>
				<Preview>78</Preview>
			</Entry>
			<Entry id="ZipCode">
				<DisplayName>ZipCode</DisplayName>
				<Preview>10234</Preview>
			</Entry>
			<Entry id="City">
				<DisplayName>City</DisplayName>
				<Preview>Berlin</Preview>
			</Entry>
			<Entry id="Country">
				<DisplayName>Country</DisplayName>
				<Preview>Deutschland</Preview>
			</Entry>
			<Entry id="PolicyNumber">
				<DisplayName>PolicyNumber</DisplayName>
				<Preview>K 123-852369/P</Preview>
			</Entry>
			<Entry id="PolicyName">
				<DisplayName>PolicyName</DisplayName>
				<Preview>Kraftfahrtversicherung Klassik Privat</Preview>
			</Entry>
			<Entry id="InvoiceDate">
				<DisplayName>InvoiceDate</DisplayName>
				<Preview>2024-06-05</Preview>
			</Entry>
		</Content>
	</DataSchema>
	<SampleSets default="SampleSet-1">
		<SampleSet id="SampleSet-1">
			<DisplayName>SampleSet-1</DisplayName>
			<Data>
				<Root>
					<FirstName>Marco</FirstName>
					<LastName>Fabiani</LastName>
					<StreetName>Mühlenstraße</StreetName>
					<HouseNumber>78</HouseNumber>
					<ZipCode>10234</ZipCode>
					<City>Berlin</City>
					<Country>Deutschland</Country>
					<PolicyNumber>K 123-852369/P</PolicyNumber>
					<PolicyName>Kraftfahrtversicherung Klassik Privat</PolicyName>
					<InvoiceDate>2024-06-05</InvoiceDate>
				</Root>
			</Data>
		</SampleSet>
	</SampleSets>
</DataDictionary>
Below you can see the external data source that we would like to use for the example. This is XML data that could be input into our gear process via REST or MQ, for example:
<?xml version="1.0" encoding="UTF-8"?>
<Policyholders>
  <Policyholder gender="female" preferredLang="de">
    <LastName>Schneider</LastName>
    <FirstName>Anna</FirstName>
    <Birthday>1985-07-22</Birthday>
    <Address>
      <ZipCode>80331</ZipCode>
      <City>München</City>
      <StreetName>Leopoldstraße</StreetName>
      <HouseNumber>23</HouseNumber>
      <State>Bayern</State>
      <Country>Deutschland</Country>
    </Address>
    <ContactDetails>
      <email>anna.schneider@example.com</email>
      <phone>01761123456</phone>
    </ContactDetails>
    <PolicyNumber premium="yes">M 456-789012/A</PolicyNumber>
    <PolicyName>Haftpflichtversicherung</PolicyName>
    <InvoiceDate>15.11.2023</InvoiceDate>
  </Policyholder>
  <Policyholder gender="male" preferredLang="en">
    <LastName>Fabiani</LastName>
    <FirstName>Marco</FirstName>
    <Birthday>1961-01-30</Birthday>
    <Address>
      <ZipCode>10234</ZipCode>
      <City>Berlin</City>
      <StreetName>Mühlenstraße</StreetName>
      <HouseNumber>78</HouseNumber>
      <State>Berlin</State>
      <Country>Deutschland</Country>
    </Address>
    <ContactDetails>
      <email>fabiani.marco@liberi.it</email>
      <phone>0171444965</phone>
    </ContactDetails>
    <PolicyNumber premium="yes">K 123-852369/P</PolicyNumber>
    <PolicyName>Kraftfahrtversicherung Klassik Privat</PolicyName>
    <InvoiceDate>24.10.2023</InvoiceDate>
  </Policyholder>
  <Policyholder gender="male" preferredLang="en">
    <LastName>Smith</LastName>
    <FirstName>John</FirstName>
    <Birthday>1970-03-15</Birthday>
    <Address>
      <ZipCode>10001</ZipCode>
      <City>New York</City>
      <StreetName>5th Avenue</StreetName>
      <HouseNumber>742</HouseNumber>
      <State>NY</State>
      <Country>USA</Country>
    </Address>
    <ContactDetails>
      <email>john.smith@example.com</email>
      <phone>2125551234</phone>
    </ContactDetails>
    <PolicyNumber premium="no">N 789-123456/B</PolicyNumber>
    <PolicyName>Health Insurance Basic</PolicyName>
    <InvoiceDate>01.12.2023</InvoiceDate>
  </Policyholder>
</Policyholders>Now we want to create a mapping file that transfers data from this source structure to the previously created data dictionary. Currently, you have to create this .ddm file manually, but this is also quite simple - in the future, this step will also be made easier by a convenient editor. Save the .ddm file in the Resource Director so that you can use it in your Gear process. Please note that our source data contains several data records; for a better overview, data mapping is carried out at the level of individual data records.
A .ddm file (data dictionary mapping) defines how certain fields from an external data source are to be transferred to the structure of the data dictionary. In the example shown, this means in concrete terms
Schema-Definition:
The <Schema> element with the ID “Root” serves as the entry point. All required fields (entries) that are to be mapped in the data dictionary are defined in this schema.
Entry-Elemente:
Each <Entry> element has a unique ID that corresponds to the corresponding field in the data dictionary (such as “PreferredLanguage”, “FirstName”, “LastName”, etc.). These IDs are crucial so that the system knows how to assign and process the data later.
Source area with XPath:
Within each <Entry> element, <Source> is used to define where the values in the external XML should come from. This is done via <XPath> expression.
For example:
<XPath>/Policyholder/@preferredLang</XPath>
This expression specifies that the value is read from the @preferredLang attribute of the <Policyholder> tag. This maps the external data structure to the desired field in the data dictionary. For “InvoiceDate”, a small conversion is even carried out using the XPath function concat, e.g. to adapt a date format
Result:
The mapping thus connects each individual field (entry) in the data dictionary with the corresponding section in the external XML data. When the process is executed later (e.g. in a gear workflow), the mapping is carried out using this .ddm file and all fields are correctly transferred to the data dictionary.
<?xml version="1.0" encoding="UTF-8"?>
<DataMapping xmlns="http://www.compart.com/ns/data-dictionary/mapping" version="1.0">
  <Schema id="Root">
    <Entry id="PreferredLanguage">
      <Source>
        <XPath>/Policyholder/@preferredLang</XPath>
      </Source>
    </Entry>
    <Entry id="Gender">
      <Source>
        <XPath>/Policyholder/@gender</XPath>
      </Source>
    </Entry>
    <Entry id="FirstName">
      <Source>
        <XPath>/Policyholder/FirstName</XPath>
      </Source>
    </Entry>
    <Entry id="LastName">
      <Source>
        <XPath>/Policyholder/LastName</XPath>
      </Source>
    </Entry>
    <Entry id="StreetName">
      <Source>
        <XPath>/Policyholder/Address/StreetName</XPath>
      </Source>
    </Entry>
    <Entry id="HouseNumber">
      <Source>
        <XPath>/Policyholder/Address/HouseNumber</XPath>
      </Source>
    </Entry>
    <Entry id="ZipCode">
      <Source>
        <XPath>/Policyholder/Address/ZipCode</XPath>
      </Source>
    </Entry>
    <Entry id="City">
      <Source>
        <XPath>/Policyholder/Address/City</XPath>
      </Source>
    </Entry>
    <Entry id="PolicyName">
      <Source>
        <XPath>/Policyholder/PolicyName</XPath>
      </Source>
    </Entry>
    <Entry id="PolicyNumber">
      <Source>
        <XPath>/Policyholder/PolicyNumber</XPath>
      </Source>
    </Entry>
    <Entry id="InvoiceDate">
      <Source>
        <XPath>concat(substring(/Policyholder/InvoiceDate, 7, 4), '-',
          substring(/Policyholder/InvoiceDate, 4, 2), '-',
          substring(/Policyholder/InvoiceDate, 1, 2))</XPath>
      </Source>
    </Entry>
  </Schema>
</DataMapping>
As you can see, we assign the values of the source data to the individual entries in our data dictionary here, e.g. the attribute @preferredLang is assigned to the data dictionary unit “PreferredLanguage”.
You can also see that we can easily perform standard XSLT data transformations, e.g. to concatenate strings, as shown in lines 57-59. XSLT and xPath functions supported by Compart can be found in the DocBridge Communication Suite documentation.
The last resource you need to use Data Dictionaries is the data-mapping XSL stylesheet, which is delivered with the DocBridge® Communication Suite. You should not normally make any changes to this.
Now we want to bring everything together and create a gear process that maps our source data into the structure of the data dictionary and generates a PDF collection file as output.
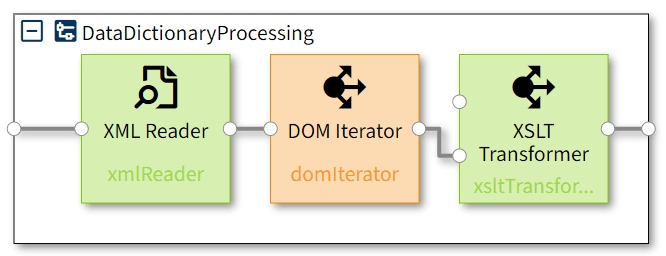
As several data sets are to be processed, we have to map the data for each data set individually. We therefore use the DOM Iterator worklet after reading the incoming XML data into a DOM. The XSLT Transformer worklet is then used to transfer the source data for each data set into the data dictionary structure.
This pre-processing sequence is best packed into a compound worklet that has a ByteReader input pin and a DOM output pin:
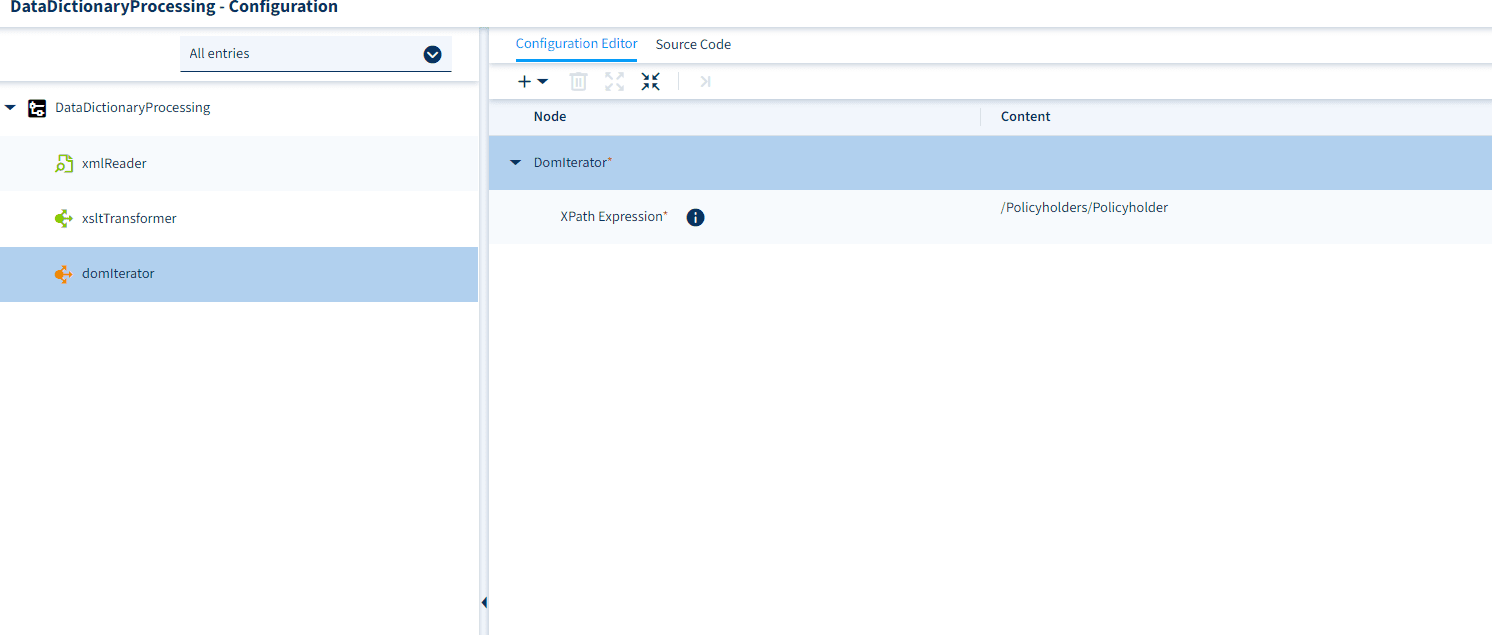
Once we have compiled the worklets, we need to configure the DOM Iterator and define the XPath expression that will be iterated over to create a separate DOM for each data set. Right-click on the DOM Iterator worklet and select “Worklet Configuration”. Using the sample data shown above, set the value as follows:
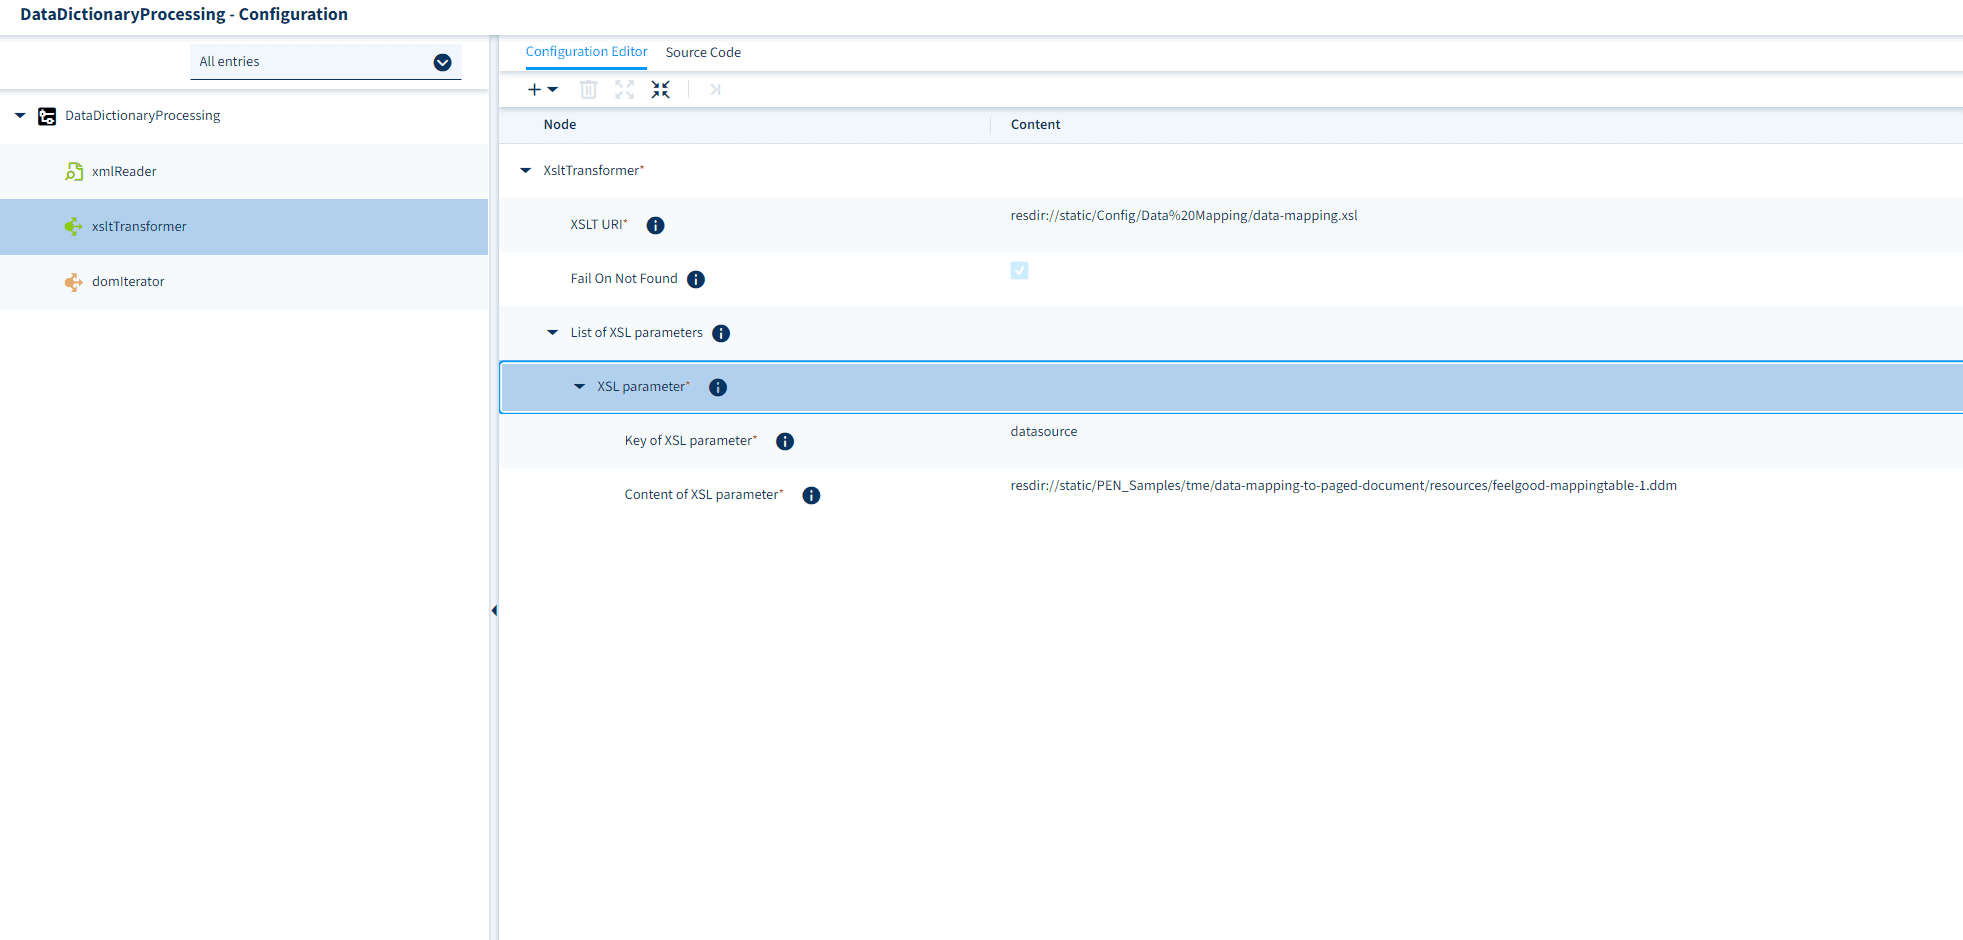
Next, open the configuration for the XSLT Transformer worklet. Here you must set both the “XSLT URI” parameter to the URI under which you have stored the data-mapping XSL stylesheet and the XSL parameter. For the XSL parameter, set the key to “datasource” and the content to the URI under which you have stored the mapping configuration. See example:
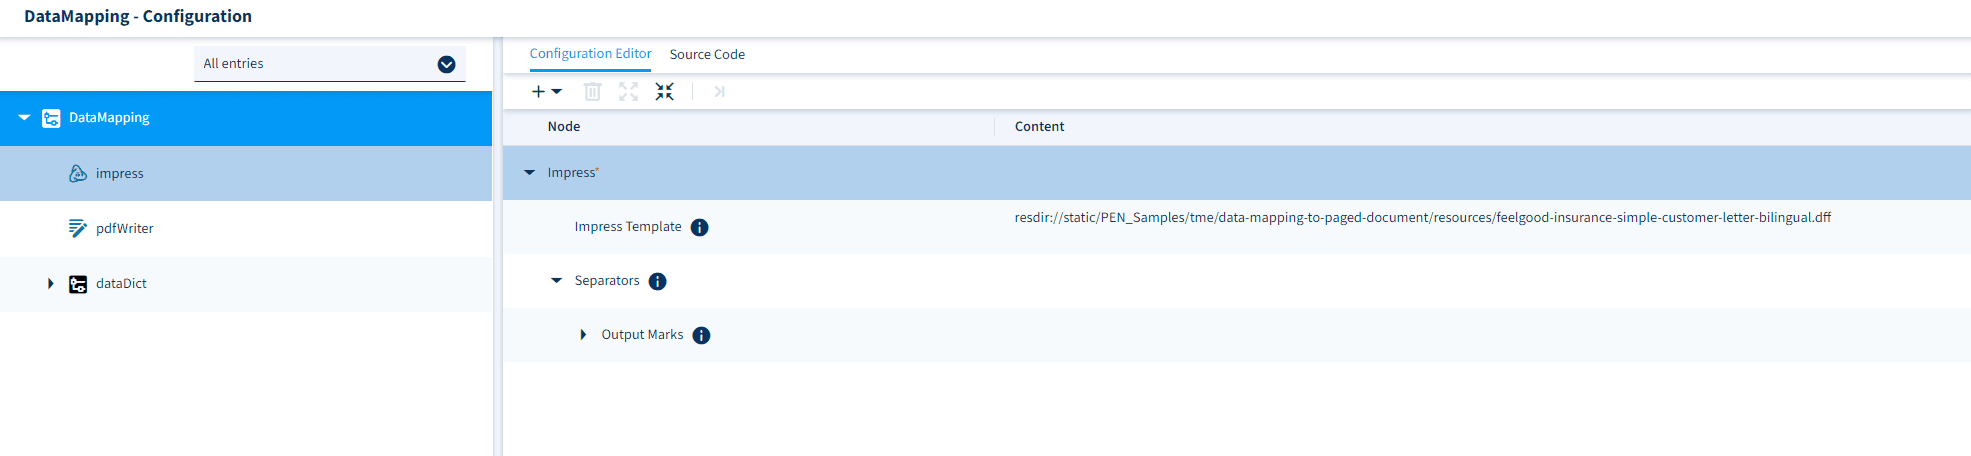
Finally, we can create our main worklet by connecting the upstream Preprocessing Compound Worklet with an Impress Worklet and a PDF Writer, as shown below. Make sure to set the parameter “Impress Template configuration” to the URI under which you have stored a suitable Impress template for your data dictionary:
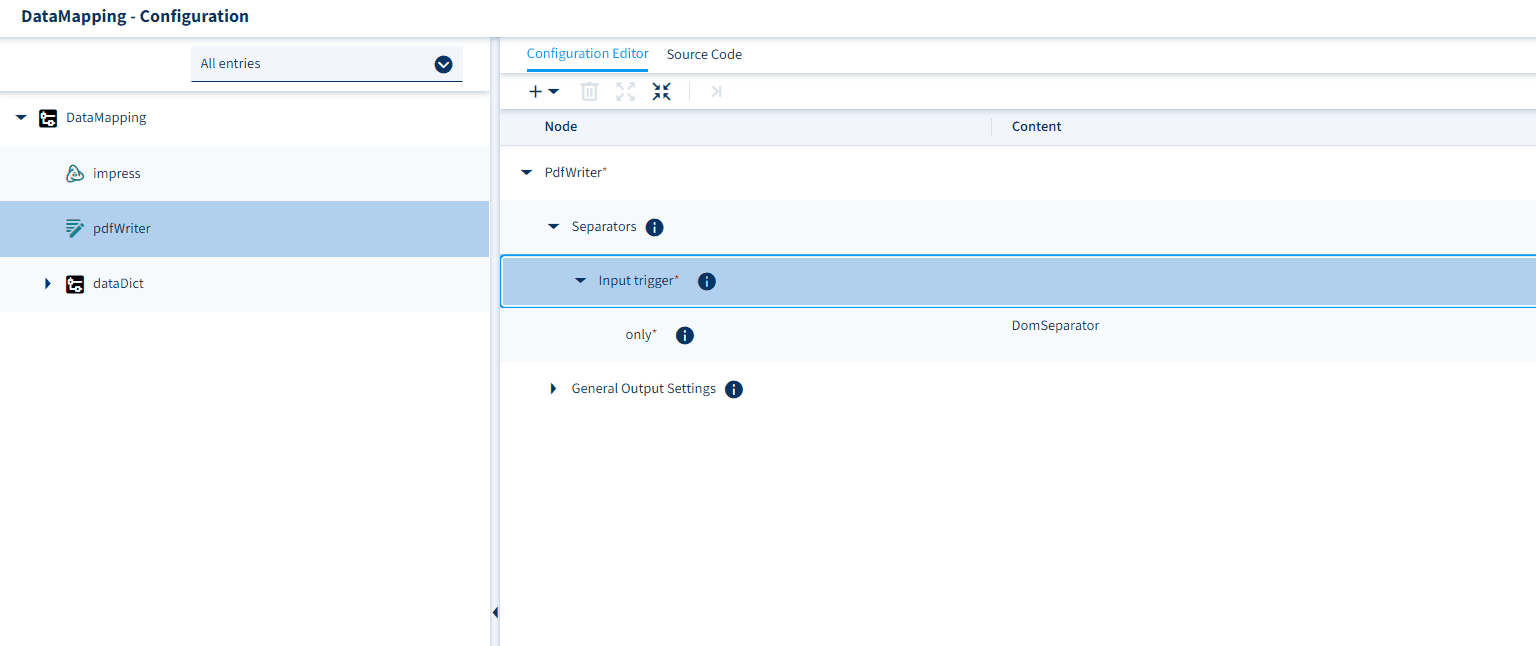
If you want to receive a single “batch” PDF output file instead of individual PDFs (because we used the DOM Iterator to split the batch input data into individual data sets), you must set the “Separators” input trigger “only” to “DomSeparator” in the configuration of the PDF Writer (right-click on the PDF Writer worklet).
The implementation of the data dictionaries in DocBridge® Communication Suite covers the essential functional scope for abstracting different external data sources from a standardized internal data model that can be used quickly and efficiently in various templates and processes.